English version of this content is provided by automatic translation without the assistance of a human translator. See the Japanese version of this content for accurate and up-to-date information.
Target plan 
On the group management screen, you can manage the members belonging to the group and the diagnosis.
Open the group management screen | About the group management screen
Open the group management screen
1. At the top of the screen  Click the icon

2. Click [Group Management]
The setting items are displayed. Click [Group Management] to display the group management screen.

About group management screen
I will explain the group management screen.

- Next to the group name
 You can change the display name of the group by clicking the icon.
 - Click Group Management Guide to see a PDF guide about the group management features.
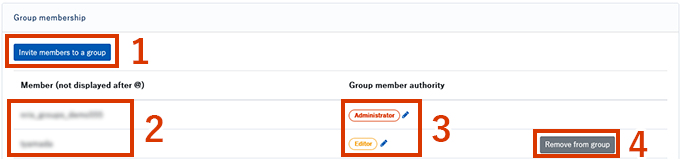
- You can invite members to a group by clicking Invite Members to Group. For more information, see Adding / removing members to a group.
- The registered members are displayed.
- The privileges of each member are displayed. There are three types of authority: administrator / editor / viewer. You can change it by clicking .
For more information on each permission, see Change group member permissions. - You can remove a member from the group by clicking Remove from Group.
If you want to add it again, add it from [Add member to group].
Note
At least one member with administrator privileges is required in the group. If you have only one administrator, you cannot change the permissions. Also, please note that the changes will be reflected immediately.
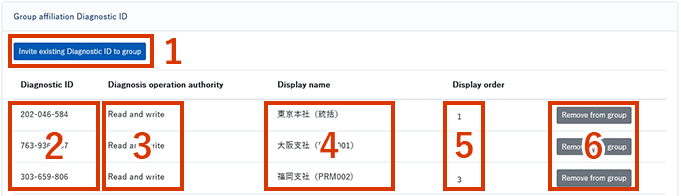
- By clicking Invite existing diagnostic ID to group, you can invite diagnostics that are already using Secure SketCH and have a diagnostic ID to the group. For more information, see Add / remove existing diagnostics to a group.
- The diagnostic ID of each diagnostic is displayed.
- The operation authority that the group member has for each diagnosis is displayed.
There are two types of operation authority: read / write / read only. - The display name of each diagnosis is displayed.
You can change the display name from the integrated dashboard. For more information, see About integrated dashboards. - The order in which each diagnostic is displayed on the integrated dashboard. If not specified, it will not be displayed.
- You can remove the diagnostics from the group by clicking Remove from Group. If you remove it, it will disappear from the integrated dashboard.
It breaks the association with the group, but the diagnosis itself is not deleted.
If you want to invite to the group again, please go to [ Invite existing diagnostic ID to group].
Note
Please note that the diagnostic operation authority and display order cannot be changed.
If you want to change it, please contact us.

- Click [Add IP Address] to add an IP address that allows access to the group function screen. For information on how to add an IP address, see Adding a group's allowed IP address.
- Displayed when there is already a registered IP address. For security reasons, the IP address is displayed in a masked state.